This tutorial will involve two of the most used secondary weebly elements: Spacer element and divider element. We categorize these two elements as secondary elements because they are not media/texts elements (such as Image, Video, Title, Paragraph Text, etc.) which are the most used weebly elements as they are vital to showcasing information on your website.
The primary purpose of this article is to help you understand how to keep consistent spacing across your website. It’s very important to have consistency in terms of color scheme, button style, fonts and spaces.
Weebly Spacer Element:
For those already familiar with weebly, there’s one element specifically designed for adding spaces in between content boxes and sections, and that is the SPACER element.
The spacer element is great a tool but I rarely use it nowadays because the element makes it difficult to have a consistent spacing. The reason for this is that you have to drag the spacer element up and down to decrease or increase the height of the spaces which makes it impossible to apply the same height each time you drag and drop the element.
Don’t miss: Weebly SEO – Choosing the right meta keywords for your website
Weebly Divider Element:
Until recently, I used the spacer element for adding spaces and the DIVIDER element for adding a horizontal divider, after all, that’s what they were designed for.
While searching for a way to have consistent spacing across my websites, I realized that using the spacer element makes it harder to achieve this, the divider element on the other hand is perfect for this. The divider element is perfect for it because unlike the spacer element, there’s no need to drag the divider element up or down in order to decrease or increase its height.
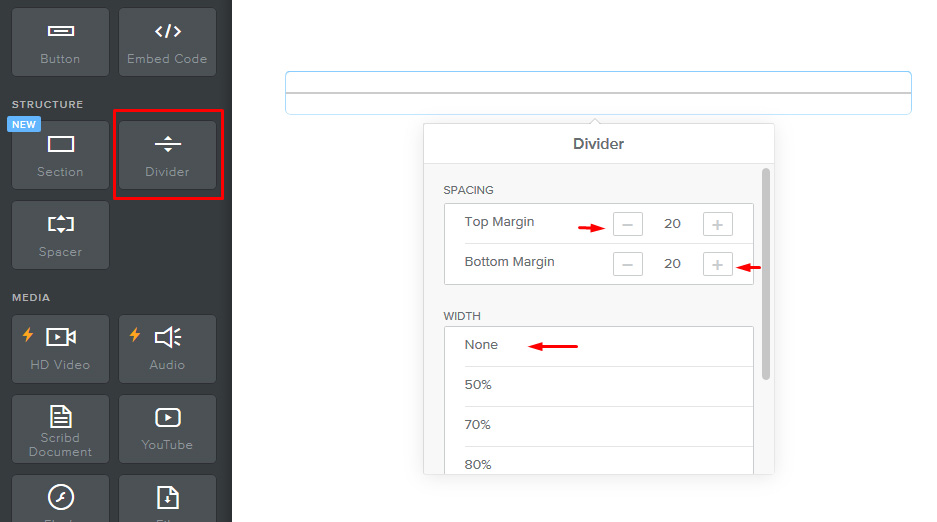
With the divider element, you simply click the plus or minus buttons from the element options box in order to add or reduce its height. In this way, you can set a consistent height for all the divider element you use across your website.
The divider element has a horizontal line which we must get rid of. Thankfully, the element comes with an option that makes it very easy to get rid of that line. After adding the weebly divider element, click on it to see its configuration options. Click “None” from those options in order to remove the horizontal line.
With the line gone, what you have left is an element much like the spacer element but with ability to set consistent height.
Don’t miss: Beautiful weebly themes for this year’s website
I prefer Spacer Element:
It doesn’t mean that you never have to use the spacer element or that you can’t use the spacer element. If you’re bent on using the spacer element but still like to have a consistent spacing, you can. By default the spacer element adds 50px height, therefore you have to options:
OPTION #1:
Leave each spacer element by its default height. Not adding or reducing the height of any of your spacer element will keep its height at 50px which will be consistent across your website.
#OPTION #2:
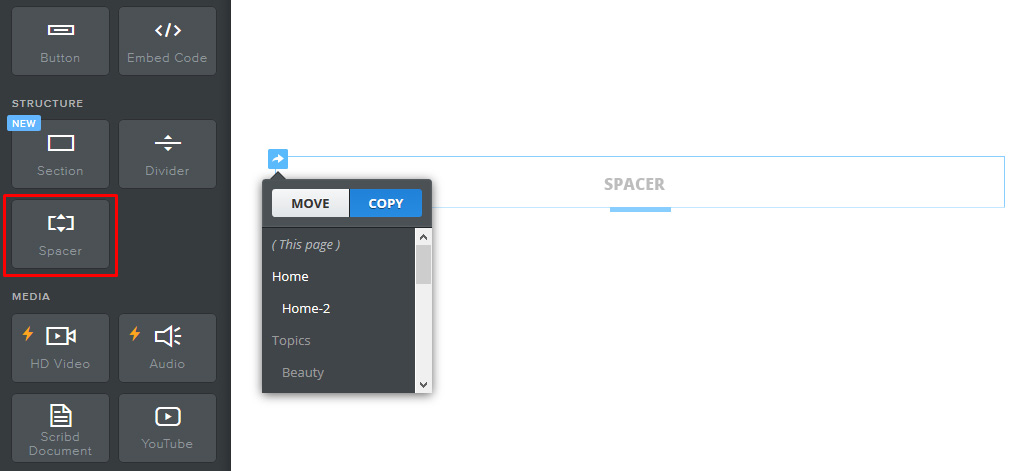
Drag and drop your first spacer element, drag it up or down to set your preferred height then use that same spacer element across your website. In order to use that same spacer element across your website, you simply make a copy of that element and use it on other sections and pages. What this means is that you only drag and drop the spacer element once, then copy that spacer element each time you want to use it.
While both elements are great tools to have for your website, you can see that it’s much better to use the divider element to add spaces to your website.